Let's quickly go over the fastest and cheapest way to deploy your Flask app and a MongoDB database on Render.com!
We will:
- Prepare the Flask app for deployment.
- Acquire a MongoDB database.
- Create a Render web service to host our app.
- Deploy!
Prepare your Flask app for deployment
To deploy any Flask app in Render.com you need to have two things clear:
- What dependencies does the app have?
- What Python version should the app use?
Once you know the answers to these questions, you can answer them:
- Write your app dependencies in the
requirements.txtfile, if you haven't already. Make sure to addgunicornandpymongo[srv]as dependencies, as Render will use them to run your app and connect to MongoDB respectively. - You'll select your Python version when you create the Render web service in step 3.
Acquire a MongoDB database
The fastest and cheapest way to acquire a MongoDB database is to use MongoDB Atlas, the official cloud database service from MongoDB. It's free for small databases!
Go to https://www.mongodb.com/atlas/database and sign up. Then you can create a free Cluster for your Flask app.
After creating a database you'll need to configure two security settings: Database Access and Network Access.
Under Database Access, create a user with a password. Make sure to use a secure password for this! For the user's Role, you can select "Read and write to any database".
Then go to Network Access, click on the "Add IP Address" button, and then click on "Add Current IP Address".
By doing this, only your computer will be able to access the database. When you create your Render service, you'll get another IP address to add to this list.
That's all the configuration you need for MongoDB! Now you can go back to the "Database" menu and click on "Connect", and then "Connect your application". Find the Python version you use, and copy the connection string. This is your MONGODB_URI, but remember to replace <password> with the secure password for the user you generated in the "Database Access" step.
Create a Render web service for your Flask app
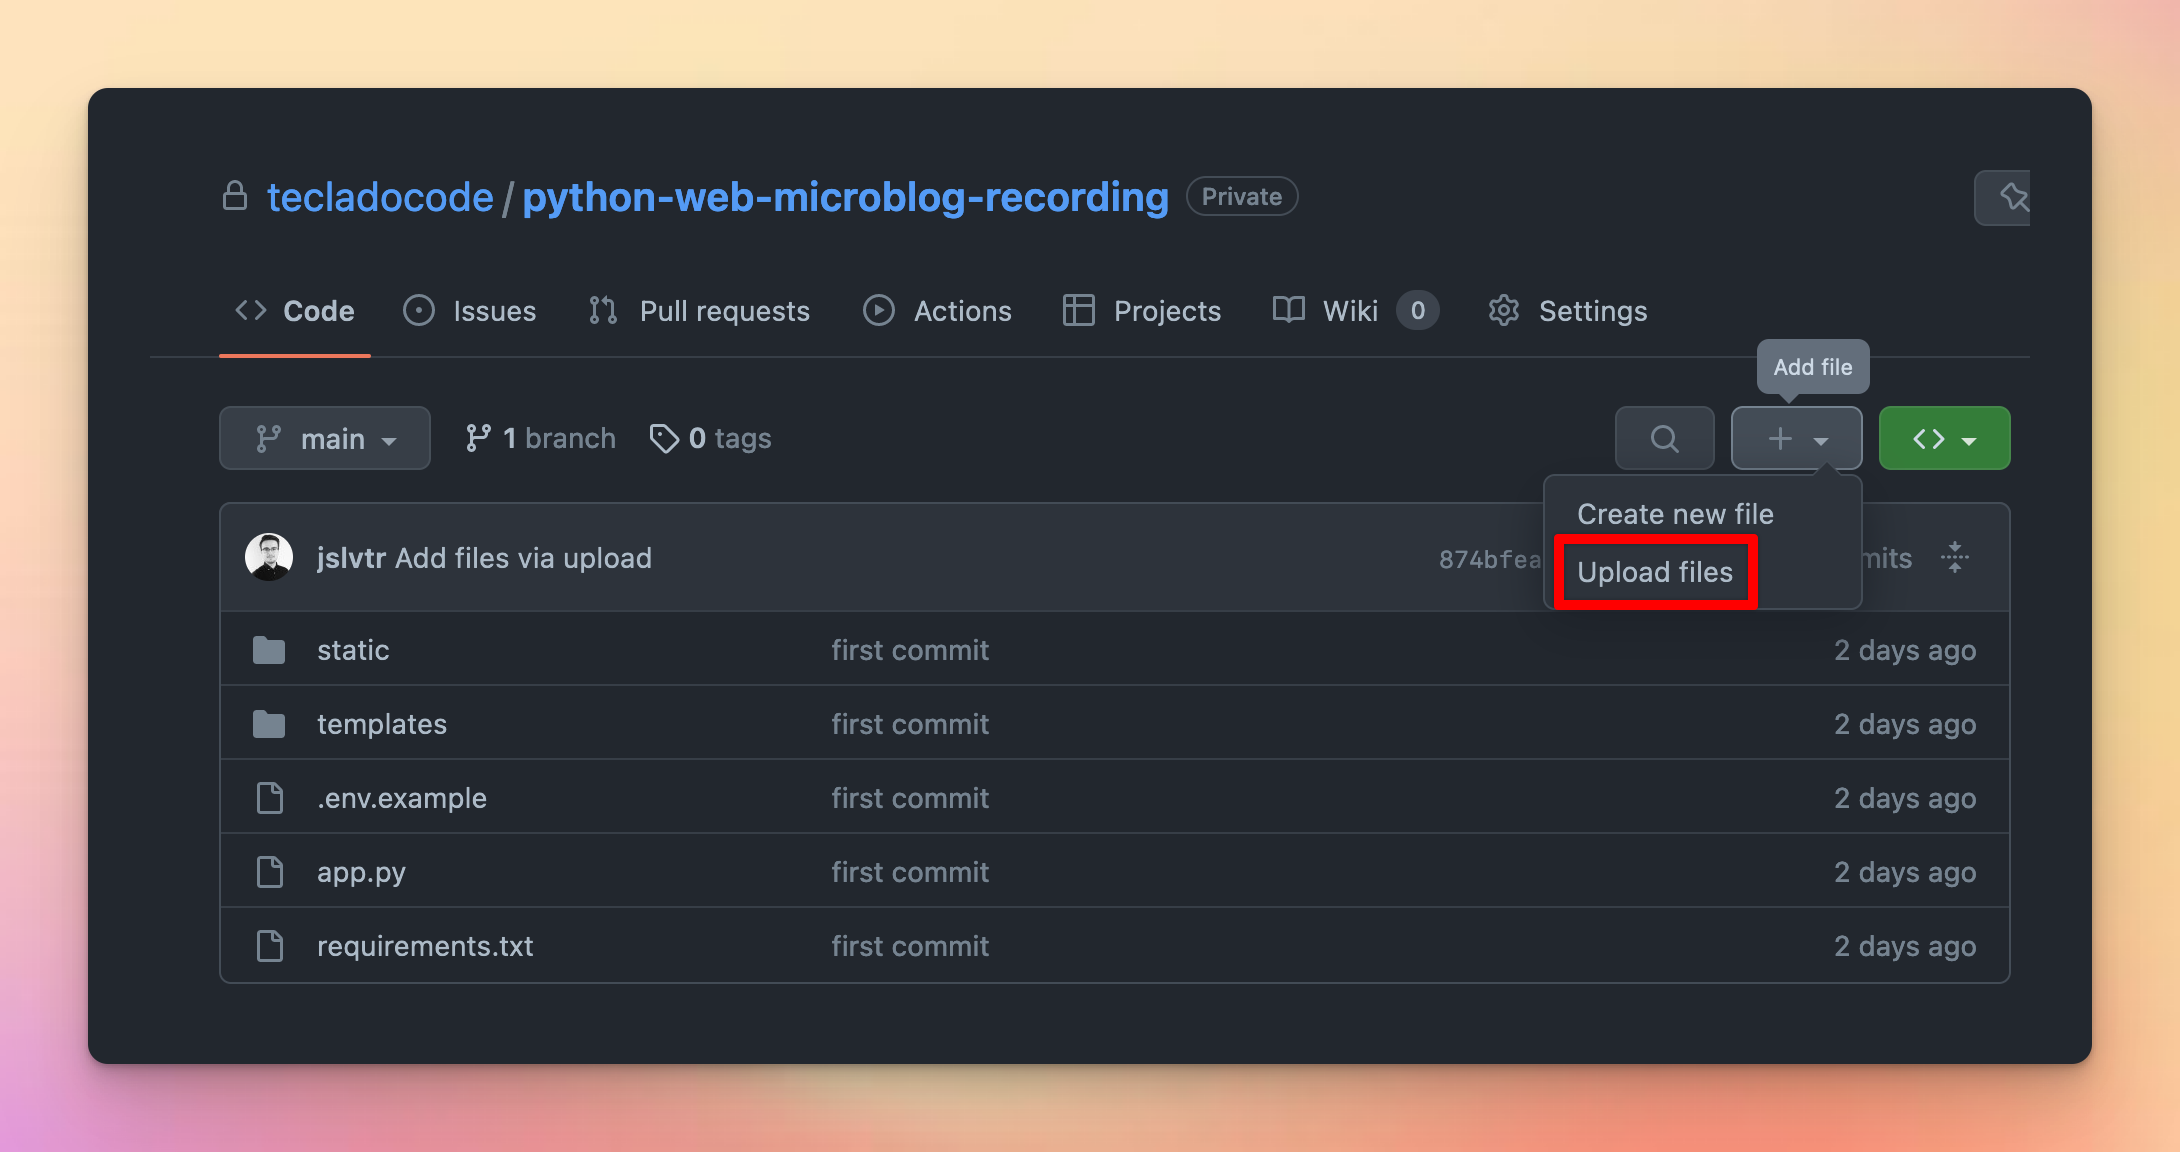
To deploy to Render, you'll need to put your app in GitHub. Create a GitHub account and a new GitHub repository. It can be public or private.
If you're unfamiliar with Git, you can add your project files to GitHub using the UI:

Once you're files are in the GitHub repository, you can go over to Render.com.
To create a Render web service you'll need to make an account, and then click on New -> Web Service at the top right.
If you haven't already at this point, you'll need to link your GitHub account with Render. After doing so, you'll see the list of GitHub repositories in Render. Click "Connect" on your repository, and that will allow Render to download your code from GitHub.
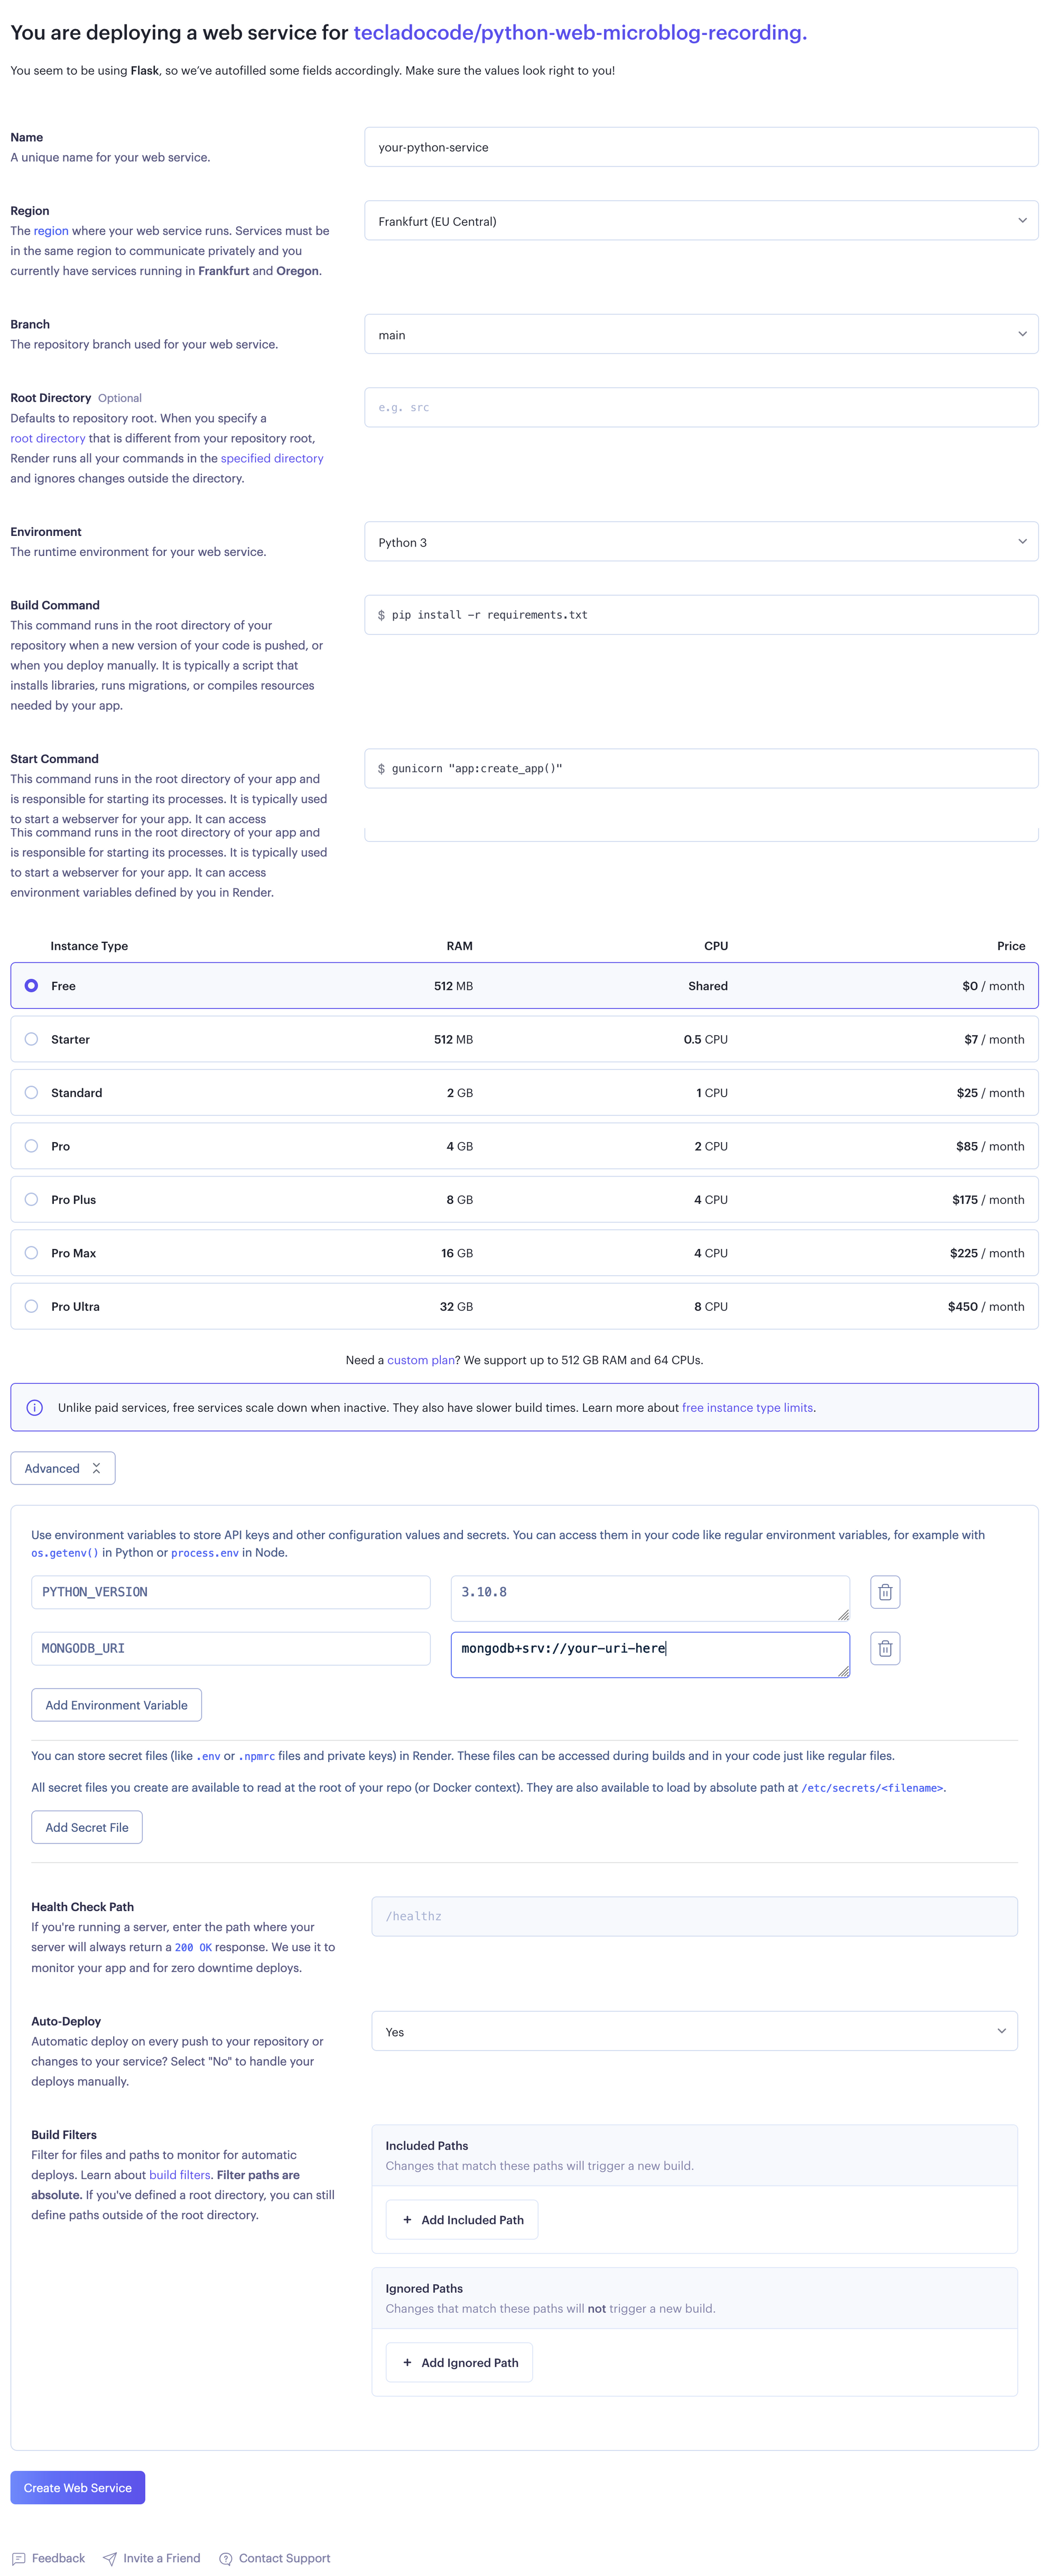
Now comes the settings for Render. For a Flask app, they should almost always look like this (long image warning, right click and open in new tab to zoom in):

Here's what's going on in that image:
- You can name your service whatever you want.
- For a Region, choose something close to you and your users.
- Your branch name should match the branch name selected in GitHub.
- The build step installs your dependencies. Since we're using
requirements.txt, this should bepip install -r requirements.txt. - The start command actually runs your application. Here we use
gunicorn "app:create_app()"because we assume you are using the Flask app factory pattern. If you aren't, you can usegunicorn app:appinstead. - We select a free server. There are a few limitations to free servers, but they're good to try out the deployment.
- In the environment variables section, we add
PYTHON_VERSIONto tell Render which Python version to use, andMONGODB_URIto store the connection string to MongoDB which your Flask app uses.
When you hit "Create Web Service", it should start deploying! It can take a few minutes though, so get a tea going and check back in 5!
Concurrency in Render with gunicorn
Once your app is deployed to Render.com, it has access to a certain amount of processing power in the Render server.
If the Flask application doesn't require all that power, you can run multiple copies of the Flask app together, in the same Render service.
That way you can save quite a bit of money (if you were not using the free option), and improve performance of you app.
And it's really easy! All you have to do is:
Go to the Environment tab in your Render.com service, and create a new environment variable called WEB_CONCURRENCY. You can set this to how many copies of your Flask app you want to run. I'd set it to 3 to start with.
Keep an eye on your Metrics, as you don't want the Memory to get close to your limit. You can see your limit in the Settings tab. The free option's memory is 256MB.
That's everything for this blog post. I wanted to show you how to get going with MongoDB and Flask in Render, but we also have another blog post on deploying Flask and PostgreSQL.
If you want to learn more about web development and Flask, consider enrolling in our Web Developer Bootcamp with Flask and Python course! It's a long video-course that covers HTML, CSS, Flask, MongoDB, deployments, and more. You'll get it at its best possible price by going through our link.
Thanks for reading, and I'll see you next time!


