In this post we're going to learn how to make use of Tkinter's Menu widget to create different types of menus in our GUI applications.
We're going to be making use of a very simple application for this post. It doesn't display anything, and until we add the menu, it won't really do anything either. Tkinter's Menu widgets are completely independent units, and don't rely on anything in our application besides the root window.
To keep things simple, our starting code is therefore going be this:
import tkinter as tk

root = tk.Tk()

root.mainloop()
We don't even need to import ttk, as Menu widgets are not themed widgets. Our very exciting Tkinter application should look something like this:

Tkinter will try to match the window to your operating system, so don't worry if yours looks a little different.
Creating our first menu
Adding a Menu widget to our application is much like adding any other element. We're going be assigning the new Menu widget to the menubar variable, and we'll be passing in root as the Menu parent.
menubar = tk.Menu(root)
We also need to add another line to tell the root window that this menubar is a menu for the window:
root.config(menu=menubar)
If you run the application at this point, you're not likely to see a lot of difference. This is because our menu doesn't have any content, so its height has collapsed to nearly zero.
So, how do we add items to the menu? We have a few options, but we're going to start by adding simple buttons that trigger commands.
We can add a button by calling the add_command method on the Menu widget instance we created.
We're going to pass in two pieces of configuration when calling this method: a label, and a command. We can set all kinds of other values, but most of them just control the appearance of the buttons in some way. We can also set the state to disable buttons, for example.
The value passed to the command parameter determines what happens when a user clicks the button, and the label determines how the option is going to display in the menu. You can also use image instead if you want.
Here are a couple of simple example buttons:
from tkinter import ttk

root = tk.Tk()

menubar = tk.Menu(root)
menubar.add_command(label="Say Hello", command=lambda: print("Hello"))
menubar.add_command(label="Say Goodbye", command=lambda: print("Goodbye"))

root.config(menu=menubar)

root.mainloop()
Note that we have to use lambda functions here, as we're passing in arguments to print. If we write something like command=print("Hello"), the function will run during the add_command execution, and the return value of print("Hello") will be passed in as the value for the command parameter. Generally not what we want.
With that, our application now has a working menu!

If we click the Say Hello button, we get Hello printed to the console, and Say Goodbye prints Goodbye. Nothing crazy, but we can use the same principles to run any operations we want.
For example, we can replace Say Goodbye with a Quit button that closes the application using root.destroy.
import tkinter as tk
from tkinter import ttk

root = tk.Tk()

menubar = tk.Menu(root)
menubar.add_command(label="Say Hello", command=lambda: print("Hello"))
menubar.add_command(label="Quit", command=root.destroy)

root.config(menu=menubar)


root.mainloop()
No need for the lambda in this case, because we don't want to pass in any arguments to the destroy method.
Dropdown Menus
When our programs get more complicated, we often want to be able to organise the application menu into various submenus for ease of navigation. The main menu then features a number of headings, each of which triggers a different dropdown menu.
To do this in Tkinter, we need to create a different Menu widget for each submenu, and one more for the menu bar itself.
Let's start by creating a new menu called salutations which is going to house our Say Hello and Say Goodbye buttons.
salutations = tk.Menu(menubar)
salutations.add_command(label="Say Hello", command=lambda: print("Hello"))
salutations.add_command(label="Say Goodbye", command=lambda: print("Goodbye"))
Note that the parent of this Menu widget isn't root: it's the main menubar widget.
We can now add this new submenu to the menubar using the add_cascade method like so:
menubar.add_cascade(label="Salutations", menu=salutations)
Once again we've set a label, which is going to determine the heading for this submenu. The menu parameter takes a Menu widget that will serve as the submenu associated with this label.
In total the code now looks something like this:
import tkinter as tk
from tkinter import ttk

root = tk.Tk()

menubar = tk.Menu(root)

salutations = tk.Menu(menubar)
salutations.add_command(label="Say Hello", command=lambda: print("Hello"))
salutations.add_command(label="Say Goodbye", command=lambda: print("Goodbye"))

menubar.add_cascade(label="Salutations", menu=salutations)

root.config(menu=menubar)

root.mainloop()
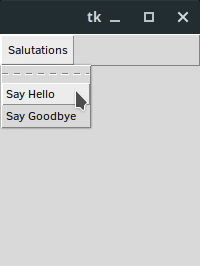
And our application can now do this:

Tear-off Menus
One thing you probably weren't expecting was the dashed line above Say Hello. What does this mean? And why is it there?
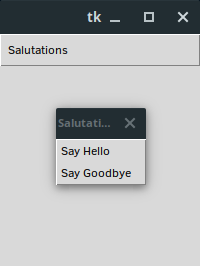
This dashed line is meant to represent perforations, indicating that the menu can be torn off. This isn't very common in modern applications, but it allows us to do something like this:

If you want to give your users the ability to detach menus and move them around the screen, you're in luck, because this is the default behaviour! If you don't want this, then we need to turn it off by passing in some additional configuration to our Menu widgets. Luckily it's very simple, we just have to add an addition keyword argument.
The official documentation uses tearoff=0, but tearoff=False also works, and I think it makes a lot more sense, so that's what I'm using here:
import tkinter as tk
from tkinter import ttk

root = tk.Tk()

menubar = tk.Menu(root)

salutations = tk.Menu(menubar, tearoff=False)
salutations.add_command(label="Say Hello", command=lambda: print("Hello"))
salutations.add_command(label="Say Goodbye", command=lambda: print("Goodbye"))

menubar.add_cascade(label="Salutations", menu=salutations)

root.config(menu=menubar)

root.mainloop()
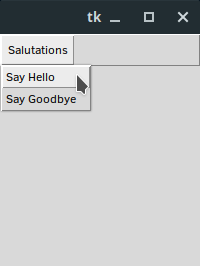
Goodbye, tear-off menu:

Some Other Menu Options
In addition to buttons and submenus, we have a few other things we can add to our menus.
Here is a menu with some of these additional options:
option_1 = tk.StringVar()
option_2 = tk.StringVar()
radio_option = tk.StringVar()

options = tk.Menu(menubar, tearoff=False)
options.add_checkbutton(label="Option 1", variable=option_1, command=lambda: print(option_1.get()))
options.add_checkbutton(label="Option 2", variable=option_2, command=lambda: print(option_2.get()))
options.add_separator()
options.add_radiobutton(label="Radio 1", variable=radio_option, value="Radio Option 1")
options.add_radiobutton(label="Radio 2", variable=radio_option, value="Radio Option 2")
options.add_radiobutton(label="Radio 3", variable=radio_option, value="Radio Option 3")

menubar.add_cascade(label="Options", menu=options)
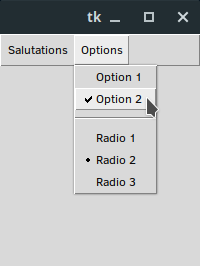
First up, we have a checkbutton, which works very much like the main Checkbutton widget. We can specify a variable to hold the current checked state; we can set values for the checked and unchecked state; and we can set a command to trigger every time the checkbutton is clicked. In our case, it retrieves the new checked state from the variable.
Next we have the add_separator method, which adds a line to the menu to help distinguish groups of options. You can use it without any additional configuration.
Finally, we have some radiobutton items in the menu. Again, these work very much like the main Radiobutton widget. In the menu above, we've just set a variable to store which of the options are toggled, and we set a value for each button.
You can see an example of this menu below:

The add Method
In addition to these specialised methods like add_checkbutton, add_cascade, and add_command, there is also a generic add method.
We can use add to replicate any of the other methods: we just need to pass in the type of item to add as a string. This can be as a positional argument, or as a keyword argument using the key itemType:
salutations.add(itemType="command", label="Say Hello", command=lambda: print("Hello"))
salutations.add("command", label="Say Goodbye", command=lambda: print("Goodbye"))
Use whichever version you prefer.
Wrapping Up
That's it for this post on Tkinter Menu widgets. I hope you learnt something new, and if you're keen to dig deeper into Tkinter, be sure to check out our GUI development course!


